A very intresting property of FFmepg is that we can use pipes inside the command. A pipe is a mechanism for interprocess communication; data written to the pipe by one process can be read by another process. The data is handled in a first-in, first-out (FIFO) order. The pipe has no name; it is created for one use and both ends of process must be inherited from the single process which created the pipe.
You can find on the Internet some very interesting examples, that are using pipes, for accessing audio and video data with FFmepg from
or Python http://zulko.github.io/blog/2013/09/27/read-and-write-video-frames-in-python-using-ffmpeg/.
Pipes with Red language
Actually, Red does not support pipe mechanism, but the problem can be solved with Red/System DSL, which provides low-level system programming capabilities. Basically, pipe mechanism is defined in the standard libc, and Red/System DSL knows how to communicate with libc. We have just to add a few functions (/lib/ffmpeg.reds):

In fact, only p-open and p-close are new. The other functions are defined by Red in red/system/runtime/libc.reds, but the idea is to let this file unchanged. This is why, p-read, p-write and p-flush are implemented in ffmpeg.reds. This also makes the code clearer.
The p-open function is closely related to the system function: It executes the shell command as a subprocess. However, instead of waiting for the command to complete, it creates a pipe to the subprocess and returns a stream that corresponds to that pipe. If you specify a r mode argument, you can read data from the stream. If you specify a w mode argument, you can write data to the stream.
Writing audio file with Red and FFmpeg
The idea is to launch FFmpeg via a pipe, which then converts pure raw samples to the required format for writing to the ouput file (see /pipe/sound.red).
This code is simple. First of all, we have to load the Red/System code to use new functions.
#system [ #include %../lib/ffmpeg.reds ]
Then, the generateSound function generates 1 second of sine wave audio data. Generated values are simply stored in a red vector! array of 16-bit integer values. All the job is then done by the makePipe routine with 2 parameters : command: a string with all required FFmpeg commands buf: the array containing the generated sound values.

As usual with Red/System routines, command string is transformed as c-string! type in order to facilitate the interaction with C library. ptr is a byte-pointer which gives the starting address of the array of values, and n is the size of the buffer. Then, we call the p-open function. Here, we have to write sound values, and thus we use w mode:
pipeout: p-open cmd "w".
Then we just have to write the array into the stream, passing as arguments the pointer to the array of values, the size of each entry in the array (2 for 16-bit signed integer), the number of entries, and the stream:
p-write ptr 2 n pipeout.
Once the job is done, we close the subprocess:
p-close pipeout.
The main program is trivial, and only FFmpeg options passed to the p-open function need some explanation.
-y is used to overwrite the output file if it already exists.
-f s16le option tells FFmpeg that the format of the audio data is raw, signed integer, 32-bit and little-endian. You can use s16be for big-endian according to you OS.
-ar 44100 means that the sampling frequency of the audio data is 44.1 kHz.
-ac 1 is the number of channels in the signal.
-i - 'beep.wav', the output filename FFmpeg will use.
Finally, the Red code calls ffplay to play the sound and display the result. Of course, since we use Red/System, the code must be compiled.

Modifying video file with Red and FFmpeg
Same technique can be used for video as illustrated in /pipe/video1.red. In this sample, we just want to invert image color using pipes.
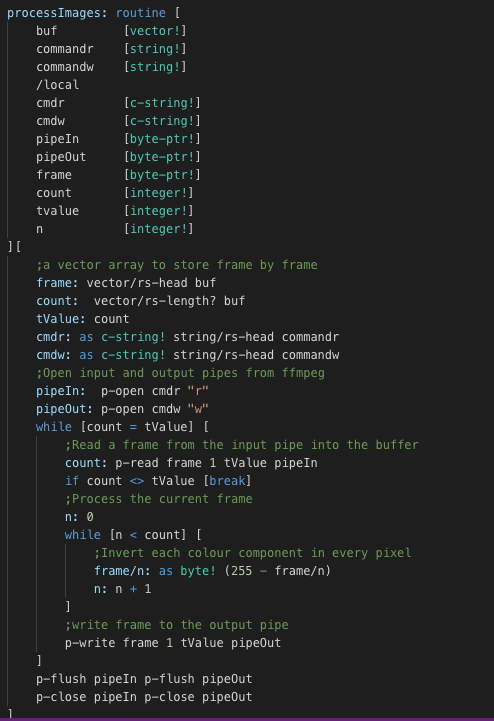
The only difference with the previous example, is that we are using 2 subprocesses: one for reading the source data, and the other for writing the modified data.
For reading data:

For writing data:

Then, main program is really simple. Once the video is processed, we can also process sound channel for adding sound to the ouput file. Lastly, we display the result.

Here is the result: source:

and the transform:

Some tips
This very important to know the size of the orginal movie before making transformations. This why you'll find here (/videos/mediainfo.red), a tool which can help you for retreiving information. Then, I am very found of Red vector data type for this kind of programming, since we can exactly choose the size of the data we need for the pipe process. Thanks to the Red Team :)
From movie to Red image
Here (/pipe/video2.red), the idea is get the data from FFmpeg to make a Red image! that can be displayed by a Red face. If the video has a size of 720x480 pixels, then the first 720x480x3 bytes outputed by FFMPEG will give the RGB values of the pixels of the first frame, line by line, top to bottom. The next 720x480x3 bytes after that will represent the second frame, etc.
Before using a routine, we need a command-line for FFmpeg:

The format
image2pipe and the - at the end signal to FFMPEG that it is being used with a pipe by another program. Then, the routine getImages transforms the FFmpeg data to a Red image! 
pixD: image/acquire-buffer rimage :handle creates pointer to get the data provided by FFmpeg. Then we read all FFmpeg data as rgb integer value and we update the image.pixD/value: (255 << 24) OR (r << 16 ) OR (b << 8) OR g
When the all image is processed, we release the memory for the next frame
image/release-buffer rimage handle yes, before calling 2 simple Red functions to control the delay between images and to display the result. If the movie contains an audio channel, the movie player plays the audio if required.
With this technique, images are not stored on disk, but just processed on-the-fly in memory, giving a very fast access to video movies with Red.
Attention: this code crashes sometimes and must be improved! In this case, kill all ffplay processes, and launch the program again. The origin of the problem is probably related to the use of #call.
All sources can be found here: https://github.com/ldci/ffmpeg/pipe


