mardi 14 juillet 2020

Face detection with redCV and Haar cascade

Haar Cascade is a machine learning object detection algorithm used to identify objects in an image or video, and is based on the concept of features detection proposed by Paul Viola and Michael Jones in their original paper Rapid Object Detection using a Boosted Cascade of Simple Features (2001). It is a machine learning based approach where a cascade function is trained from a lot of positive and negative images. The cascade is then used to detect objects in other images.
in redCV the implementation does not include the training part of the algorithm. The cascade classifier is a simplified implementation which uses pre-trained parameters for the cascade classifier. redCV cascades files are similar to OpenCV xml files, but are text files for a faster access.
In original Viola-Jones cascade (stump-based cascade), each tree is composed of 3 nodes at max. Each node has no leaf, and left and right values are used for decision. Features can be tilted. In the improved version (Rainer Lienhart and Jochen Maydt, tree-based cascade), nodes can have left and right leaves. If the calculated value is less than the node threshold, we have to go to the next left or right node. 
redCV uses 23 parameters by stage with the support of stump and tree-based cascades. Titled features are also supported.  All information is inside the classifier text file:


[Header] Section
how many stages are in the cascaded filter?
the second line of file is the number of stages
how many filters in each stage? 
They are specified starting from third line
Filters are then defined in [Nodes] section
First line: window training size
then each stage of the cascaded filter has:
23 parameters per filter + 1 threshold parameter per stage
The 23 parameters for each filter are:
1 to 4: coordinates of rectangle 1
5: weight of rectangle 1
6 to 9: coordinates of rectangle 2
10: weight of rectangle 2
11 to 14: coordinates of rectangle 3 (default 0)
15: weight of rectangle 3 (default 0.0)
16: tilted flag
17: threshold of the filter
18: alpha 1 of the filter ; left node value
19: alpha 2 of the filter ; right node value
20: has left node?                 
21: left node value; 0, 1 or 2
22: has right node?
23: right node value; 0, 1 or 2


Part of redCV code is based on C code sample, developed by Francesco Comaschi (http://www.es.ele.tue.nl/video/). redCV object detection is a mix of Red/System and Red language since we need structures, pointers and large arrays for robust and fast execution. Code is rather good for detecting faces in images and videos. redCV uses several techniques:
Image pyramid

This is a multi-scale representation of an image, such that the object detection can be scale-invariant, for detecting large and small objects inside the same detection window. In the redCV code, the image pyramid is implemented by down-sampling the image with neighboring pixels algorithm.


rcvNearestNeighbor routine implements up and down-sampling. Nearest neighbor is the simplest and fastest implementation of image scaling technique. It is very useful when speed is the main concern. The principle in image scaling is to have a source image and using this image as the base to construct a new scaled image. The destination image will be smaller, larger, or equal in size depending on the scaling ratio. When enlarging an image, we add empty pixels in the original base picture. Up-sampling algorithm is to find appropriate value to use for the modified image, and to fill all those spaces with color. The empty pixels will be replaced with the nearest neighboring pixel. Down-sampling, in the other hand, involves reduction of pixels. In this case scaling algorithm is to find the best pixels to throw away.


The information we need are both the horizontal and vertical ratios between the original image and the to be scaled image, given by this equation.

Integral image and Haar features
As explained in redCV manual, integral image (or summed area table) is a way to sum up the pixel values within a rectangular region only defined by 4 points, which becomes very efficient if we need to calculate the pixels values of many regions of interest within an image.  For a discrete image i its integral image ii at the pixel (x, y) is defined as the sum of the pixel values of i above and to the left of (x, y), according to this equation:
Given the integral image, the sum of all the pixels within a rectangle aligned with the image axes can be evaluated with only four array references, regardless of the size of the rectangle. On the other hand, Haar​ feature considers adjacent rectangular regions at a specific location in a detection window, sums up the pixel intensities in each region and calculates the difference between these sums.


In redCV, integral images are used in association with Haar features to make a fast and efficient computation.

Sliding Window
The algorithm uses a sliding window that shifts around the whole image at each scale to detect the objects, as shown in the next figure. In redCV implementation, the sliding window shifts pixel-by-pixel by default, but this step can be increased for a faster processing.  Generally, the size of the sliding window corresponds to the size of the window used for training the cascade.


Cascade classifier
Each time the window shifts, the image region within the window will go through the cascade classifier which consists of several stages of filters. This is done stage-by-stage. Each stage of the classifier labels the region defined by the current location of the sliding window as either positive or negative according to the stage threshold value. Positive value indicates that an object was found and negative value indicates no objects were found.  If the label is negative, the classification of this region is complete, and the cascade classifier will immediately reject the region as an object, and the detector slides the window to the next location.  If the label is positive, the classifier passes the region to the next stage.  The detector reports an object to be found at the current window location when the final stage classifies the region as positive. This means that if a region succeeds all stages, it will be classified as a candidate, which may be refined by further post-processing.


Lastly, post-processing includes a distance-based clustering of rectangle candidates in order to select the best candidate. 

redCV implementation of objects detection is optimized with Red/system structures and routines and is really comparable to C++ implementation in OpenCV. 

faceDetection.red is a generic program devoted to face detection in image. The code uses a lot of parameters for a fine-tuning of object detection (see redCV manual for detail). Code was tested with a lot of different images and the results are pretty good.

Let’s begin with a simple image with one face which is identified in only 40 ms vs. 20 ms for a C++ code with OpenCV.
The code can also identify right, left or both eyes with, and without glasses.

This new image is interesting since faces are large or small due to the perspective, and some faces are slightly tilted or rotated. All faces are identified. This means that image pyramid implemented in redCV is rather good.


redCV implementation is also efficient for important number of faces and a large image: only 1180 ms for identifying 29 faces in a 1280x626 pixels image.

The last sample shows that redCV Haar cascade classifier can also be used for complex scenes as in this Paul Delaroche’s oil painting. Task was rather difficult since the painting contains intensely dark areas, and Jane Grey’s face is masked. Most of faces are tilted and rotated (e.g. the ladies and the lieutenant of the London tower).

All code for face recognition will be updated within a few days here: https://github.com/ldci/redCV
redCV is updated now.


© François Jouen & Red Foundation 2020

lundi 26 août 2019

redCV and FFmpeg: Using pipes

As indicated in FFmpeg documentation, FFmpeg reads from an arbitrary number of input files (which can be regular files, pipes, network streams, grabbing devices, etc.), specified by the -i option, and writes to an arbitrary number of output files, which are specified by a plain output url.
A very intresting property of FFmepg is that we can use pipes inside the command. A pipe is a mechanism for interprocess communication; data written to the pipe by one process can be read by another process. The data is handled in a first-in, first-out (FIFO) order. The pipe has no name; it is created for one use and both ends of process must be inherited from the single process which created the pipe.
You can find on the Internet some very interesting examples, that are using pipes, for accessing audio and video data with FFmepg from 

Pipes with Red language

Actually, Red does not support pipe mechanism, but the problem can be solved with Red/System DSL, which provides low-level system programming capabilities. Basically, pipe mechanism is defined in the standard libc, and Red/System DSL knows how to communicate with libc. We have just to add a few functions (/lib/ffmpeg.reds):
In fact, only p-open and p-close are new. The other functions are defined by Red in red/system/runtime/libc.reds, but the idea is to let this file unchanged. This is why, p-read, p-write and p-flush are implemented in ffmpeg.reds. This also makes the code clearer.
The p-open function is closely related to the system function: It executes the shell command as a subprocess. However, instead of waiting for the command to complete, it creates a pipe to the subprocess and returns a stream that corresponds to that pipe. If you specify a r mode argument, you can read data from the stream. If you specify a w mode argument, you can write data to the stream.

Writing audio file with Red and FFmpeg

The idea is to launch FFmpeg via a pipe, which then converts pure raw samples to the required format for writing to the ouput file (see /pipe/sound.red).
This code is simple. First of all, we have to load the Red/System code to use new functions.
#system [ #include %../lib/ffmpeg.reds ]
Then, the generateSound function generates 1 second of sine wave audio data. Generated values are simply stored in a red vector! array of 16-bit integer values. All the job is then done by the makePipe routine with 2 parameters : command: a string with all required FFmpeg commands buf: the array containing the generated sound values. 

As usual with Red/System routines, command string is transformed as c-string! type in order to facilitate the interaction with C library. ptr is a byte-pointer which gives the starting address of the array of values, and n is the size of the buffer. Then, we call the p-open function. Here, we have to write sound values, and thus we use w mode:
pipeout: p-open cmd "w".
Then we just have to write the array into the stream, passing as arguments the pointer to the array of values, the size of each entry in the array (2 for 16-bit signed integer), the number of entries, and the stream:
p-write ptr 2 n pipeout.
Once the job is done, we close the subprocess:
p-close pipeout.
The main program is trivial, and only FFmpeg options passed to the p-open function need some explanation.
-y is used to overwrite the output file if it already exists.
-f s16le option tells FFmpeg that the format of the audio data is raw, signed integer, 32-bit and little-endian. You can use s16be for big-endian according to you OS.
-ar 44100 means that the sampling frequency of the audio data is 44.1 kHz.
-ac 1 is the number of channels in the signal. 
-i - 'beep.wav', the output filename FFmpeg will use.
Finally, the Red code calls ffplay to play the sound and display the result. Of course, since we use Red/System, the code must be compiled.

Modifying video file with Red and FFmpeg

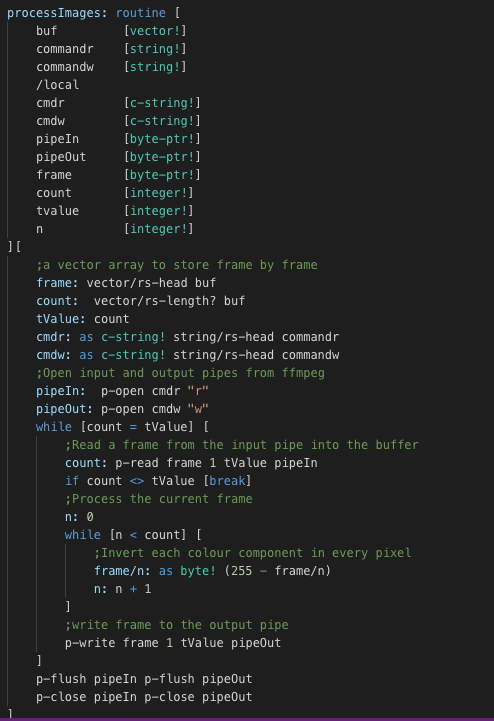
Same technique can be used for video as illustrated in /pipe/video1.red. In this sample, we just want to invert image color using pipes.

The only difference with the previous example, is that we are using 2 subprocesses: one for reading the source data, and the other for writing the modified data.
For reading data:


For writing data:

Then, main program is really simple. Once the video is processed, we can also process sound channel for adding sound to the ouput file. Lastly, we display the result. 

Here is the result: source: 
and the transform: 

Some tips

This very important to know the size of the orginal movie before making transformations. This why you'll find here (/videos/mediainfo.red), a tool which can help you for retreiving information. Then, I am very found of Red vector data type for this kind of programming, since we can exactly choose the size of the data we need for the pipe process. Thanks to the Red Team :)

From movie to Red image

Here (/pipe/video2.red), the idea is get the data from FFmpeg to make a Red image! that can be displayed by a Red face. If the video has a size of 720x480 pixels, then the first 720x480x3 bytes outputed by FFMPEG will give the RGB values of the pixels of the first frame, line by line, top to bottom. The next 720x480x3 bytes after that will represent the second frame, etc. 
Before using a routine, we need a command-line for FFmpeg:

The format image2pipe and the - at the end signal to FFMPEG that it is being used with a pipe by another program. Then, the routine getImages transforms the FFmpeg data to a Red image! 

pixD: image/acquire-buffer rimage :handle creates pointer to get the data provided by FFmpeg. Then we read all FFmpeg data as rgb integer value and we update the image.
pixD/value: (255 << 24) OR (r << 16 ) OR (b << 8) OR g
When the all image is processed, we release the memory for the next frame image/release-buffer rimage handle yes, before calling 2 simple Red functions to control the delay between images and to display the result. If the movie contains an audio channel, the movie player plays the audio if required.

With this technique, images are not stored on disk, but just processed on-the-fly in memory, giving a very fast access to video movies with Red.

Attention: this code crashes sometimes and must be improved! In this case, kill all ffplay processes, and launch the program again. The origin of the problem is probably related to the use of #call.

All sources can be found here: https://github.com/ldci/ffmpeg/pipe

redCV and FFmpeg: Video reading

redCV and FFmpeg: Video reading

As previoulsy explained, Red and FFmpeg collborate rather well for video and audio recording. In this new post, we'll focus on video reading.

A simple approach: Use ffplay tool

A simple, but efficient way, is to call ffplay tool which is included in FFmpeg framework. Just open a terminal session, and give the name of the movie to read.
ffplay Wildlife.wmv


While running movie, different options can be used form controlling the ouput:
f: for fullscreen
m: toggle audio
p, space: pause/resume the movie
/, *: decrease and increase volume respectively
During the reading of the movie, ffplay returns a lot of information about the video:


Of course, this command can be integrated in Red code as parameter of call function, and GUI program can be developped to avoid command-line use (see /video/ffplay.red code). It is important to use /shell refinement for call, since ffplay uses the terminal to display different information:

 call/shell "ffplay Wildlife.wmv"


This simple approach is very confortable for reading and listening all supported video files and, this is the way I prefer for reading movies without using VLC or Quick Time Player.

A second approach: Extract frames from a movie

In many applications, I don't need tp process audio channel, but I have to focus on images in order to make redCV image processing on time-lapse videos. 
To turn a video to number of images, run the command below. The command generates the files named image0001.png, image0002.png and so on.
ffmpeg -i filename image0d.png
This command is included in video/movies.red program and, associated to Red code for creating an efficient video reader with a clean GUI interface. T

he code is very simple, but contains some interesting functions.
First of all, to create elegant navigation buttons, we profite the fact that Red supports unicode string :)


The second important function concerns the generation of line-command for FFmpeg.


FFmpeg options are very simple:
"/usr/local/bin/ffmpeg" ;location of ffmepg binary
" -y" ;automatically replace image files
"-f image2" ;The image file muxer writes video frames to image files 
" -s 720x480" ;output size
" -q:v 1" ;use fixed quality scale (1 to 31, 1 is highest)
" -r " frames per sec ;fps (mandatory for .vmw files)
" " dataDir ;temp destination directory"img-%05d.jpg" 
;automatic file name numbering
The rest of the code is pure Red and very easy to understand. First of all, you have to select a movie file. When done, FFmpeg is called to create, in a temprary directory, all jpg images corresponding to the number of frames contained in the movie. You can also play with the FPS to create more or less images. Navigation buttons, slider and, text-list faces can be used to directely access any image. When you press the Play/Stop button, for a complete reading, text-list face is disabled. 

redCV and FFmpeg: Video and audio capture

FFmpeg is a fabulous command-line framework for multimedia processing. Among variety of features, FFmpeg can capture video and audio from your computer's camera and microphone. Since Red language does support video capture, it was really easy to connect both programs and realize a nice Red video recorder. Red is used to display camera images on screen and, FFmpeg to record movie.

Wiith this Red code, you can select video and audio inputs, change the quality and size of the recorded video. You can also control the frequency of recorded frames (FPS).

Supported video files for recording are mpg, mp4, mkv, avi, wmv, and mov.

Before we start, you must have Red language (http://www.red-lang.org) and FFmpeg (https://www.ffmpeg.org/) installed on your computer and you must know the path of the FFmpeg binary such as /usr/local/bin/ffmpeg for Mac or Linux.

As Red, FFmpeg is cross-platform and can be used vith various operating systems. The Red getPlateform function is called to select the running OS and then to use the correct FFmpeg input device.


Then, the second operation is to generate the command-line that will be passed as parameter to FFmpeg binary. This is done by Red function generateCommands.


In the code above, a few of FFmpeg options and Red words are used:

-f inputDevice: to use the OS device for grabbing video (on macOS, we use the avfoundation device).
-framerate frameRate: the FPS (1..30) for recording.
-video_size videoSize: required video size (a pair WxH, on my MacBook Pro: "1280x720" or "640x480").
-i  vDevice:aDevice: the video and audio device used for recording. By default, vDevice = 0 corresponds to the first camera found on computer (e.g. Apple FaceTime Camera on macOS), and aDevice = 0 to computer microphone.  
-target target: this is a combination of 2 values for determining the quality of the video (e.g film_dvd). 
lastly the fileName is provided to store the video.

When FFmpeg command-line is generated, we just need Red call function to start or stop the movie grabbing.


In less than 150 lines of code, we get a very efficient movie grabber which records both video and audio channels.  

You'll find the code here: https://github.com/ldci/ffmpeg/video/camera.red. Enjoy:)